I hope it does!!!
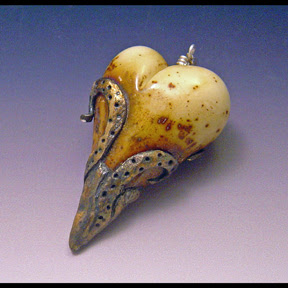
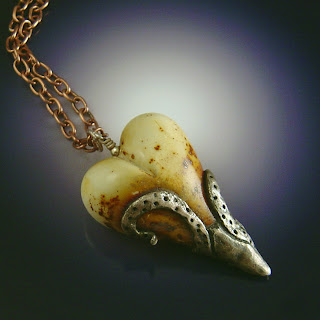
First, a before and after.
BAD PICTURE

GOOD PICTURE

See the difference?

Now let me tell you my secret....shhhhhh........the dramatic lighting in the second photo? It has MUCH less to do with lighting and much MUCH more to do with the background.
In photoshop I made a square, I think 8x8, 300dpi, filled it with black, then used the eraser tool to "erase" a spot of light in the middle. Then, and this is important, I printed it on shiny photo paper. Feel free to use the one I made.

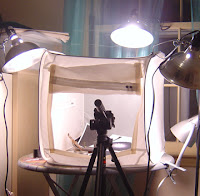
I use a ginormous light tent I bought when I was painting glassware, you do not need anything this huge. I have it lit with 3 cheap-o clamp lights from the hardware store and I'm using 100w GE Reveal bulbs.
I'll tell you how I have my camera set, but this was pure trial and error, and your camera will have more or less settings to screw around with. I have a 5mp Sony Cyber-shot. I always use the macro setting (that little tulip). Under "menu" I set the
METERING MODE to SPOT, the FOCUS to MULTI AUTO FOCUS, and the WHITE BALANCE to LIGHTBULB. Then I play.
When I point the camera at my piece I'll see the lighting change dramatically, and I'll just keep moving it slightly until the white spot on my background is bright, but
the piece I'm photographing has enough contrast. I had to play around with this for a while before I figured out what the look for. Use your tripod, and use the timer on your camera.
I've found that most of the time when I shoot this way I only have to do one touch up in photoshop, and generally it's just an auto color correction. For some reason the background almost always comes out an indigo blue, but if I click auto color correction it changes it back to black while keeping the colors correct on the piece being photographed.
I really hope this was worth the wait. And please, if you have questions I will try my best to answer them.
Happy shooting!!
10 comments:
thanks so much for this! I've been wondering how to get a cool background in my boring pictures :) Yours looks fantastic. And really cool bead on there!
Thanks Pam!
Hope I helped.
I noted your snazzy new photos on etsy yesterday. They truly look great!
Hi Loriola,
I saw your post on LE and checked out your blog. Thanks for sharing this information. Do you place your bead right on the photo paper, or above it on one of those frosted riser thingies that that photo setup outfit sells?
Thanks again, and awesome bead, BTW. FWIW I thought that the first photo wasn't all that bad!
Patty
Superb tutorial..and even sweeter bead. Its really great when people share what they've figured out on their own.
So nice of you to share! Taking pics is such a challenge, so tips like these are so great! And congrats on taking such a great shot.
Thanks for taking the time to read my blog!!!
*waving*!!
Patty, I just place the bead right on the paper. I refuse to spend one more $ on photo stuff.
I think your first photo is great too! I wish mine came out as well as yours.
I downloaded your "spotlight". I might just have to go home and try your technique.
Thanks for sharing!
Lori... this background has made a HUGE difference with my bead images... THANK YOU! Everyone asks if my photos are professionally taken these days... nope, just your background (& finding the spot meter on my camera!!)... I give you total credit for the background & tell them about your tutorial. THANK YOU for sharing this w/ the masses!! :o)
~ Julie
Hi Lori
Your tutorial has made a huge difference in how my beads photography - thank you so much for sharing your info with us.
Post a Comment